Howto: Manage your file collection using KDE 4.7 and the Nepomuk-Framework
(2014-01-19)
As an addition to this article, there is an update now about the changes since KDE 4.7, using KDE 4.11 as reference version:
https://kdenepomukmanual.wordpress.com/2014/01/16/nepomuk-manual-update-kde-4-11-2/
Because I wasn’t able to find a complete KDE-Nepomuk documentation or howto, where everything important for the user is covered (from the installation to the search queries, with all the caveats), I decided to write one myself. It is intended for understanding and using Nepomuk, in combination with Dolphin, digiKam, Gwenview and Krunner, but no development topic is covered. It is also far from complete, so any information (about mistakes, additional topics,…) is HIGHLY APPRECIATED 🙂
You can download a PDF version of this manual here:
http://pdfcast.org/download/kde-nepomuk-semantic-desktop-user-s-manual.pdf
Note (2012-03-10):
KDE shipped version 4.8.1, containing performance improvements and bugfixes for Nepomuk and applications using Nepomuk. So everyone who experienced problems should give it a try.
http://www.kde.org/announcements/announce-4.8.1.php
Content of the KDE Nepomuk Howto :
1) What is Nepomuk and Nepomuk-KDE?
1.1) Why should someone use Nepomuk?
1.2) What is Nepomuk?
2) Setting up Nepomuk for KDE 4.7
3) Using Nepomuk
3.1) Dolphin
3.2) digiKam
3.3) Gwenview
3.4) Krunner
1) What is Nepomuk and Nepomuk-KDE?
1.1) Why should someone use Nepomuk?
Usually, data on the hard disk is organised by their file names and directory structure. The common way to open a file is to change into its directory and open it by filename, if the filename and its directory is known. Otherwise, a filename or file content search is performed to locate the file. To look at its content, usually it has to be opened.
Nepomuk uses this common ways too, but extends it with more ways to describe a file, so it is easier to locate it and to get more information than just the filename from it.
So Nepomuk is for you if you:
– Think that organising your files only with subdirectories and filenames is not informative and efficient enough.
– Have large collections of pictures and/or music and you want to perform searches among them.
– Have large collections of pictures and/or music and you want to get information of the files without opening it (i.e. who is on a picture, which one was good etc.).
– Keep different versions of the same file or folder on your hard drive and you want to have information available which specifies them.
– Work with more files distributed in different folders over your hard drive and you don’t want to have so many file manager tabs opened.
– Want to perform indexed searches for file contents over all files on your hard drive.
– Download lots of files from the internet where you need to remember the download-URL (i.e. for citations in scientific papers)
– Want to store more information to files you downloaded.
– Have large documents or papers where you want to rate them and remember the important parts.
Nepomuk is not for you if you:
– Feel completely satisfied organising your hard drive by files and folders
– Work frequently on different computers and operating systems (because the KDE Nepomuk database is not transferrable to Microsoft Windows)
1.2) What is Nepomuk?
Nepomuk stands for“Networked Environment for Personal, Ontology-based Management of Unified Knowledge” and is the specification of a semantic desktop. KDE implemented it in Nepomuk-KDE.
Semantic Desktop…to me it sounded more like something that I want to keep as far away aspossible from my desktop. But I gave it a try, and really, it’s not that bad. Although there is no strict specification what a semantic desktop should be like, there is one main feature: Assigning meta-data to any kind of file. You probably know this from the ID3-tags of mp3 files, where information like artist, album, year and some tags can be stored independently of the filename. Now imagine to be able to do this to any kind of file, be it a text-file, video-file, or whatever. And to be able to search for them afterwards using the meta-data and content.
With the Nepomuk semantic desktop enabled, you will be able to do the following kind of things:
– Assign tags to files
– Assign arbitrary comments to files
– Give ratings to files
– Indexed search in the whole file system for file names
– Indexed search in the whole file system for file contents
– Indexed search for file types and modification dates
– Indexed search for tags
– Create virtual folders (folders where all files matching certain search criteria are shown, i.e. a certain tag or rating)
Unlike mp3-files, the meta-data is not stored in a file itself, but in a central database in KDE. In order to be able to view it on another computer, you have to transfer it.
The Nepomuk framework consists of several parts that implement the functionality:

Nepomuk is the framework itself, that provides the functionality implemented in several programs, like rating your files etc. Requests are passed to soprano, which is a library for reading and writing RDF data (resource description framework, designed by the W3C for storing metadata of files, exactly what we need here). The data itself is stored in a virtuoso database. And how do we get the data? This is Strigi’s task, a file indexer that scans for metadata in the filesystem.
2) Setting up Nepomuk for KDE 4.7
The semantic desktop inKDE 4.7 works basically out of the box, there are only a few clicks to do.
First of all, you have to install all the required elements that are needed with the package manager.
So start YaST2 or any other package manager and make sure to install the following packages:
– nepomukcontroller
– strigi
– libstrigi0
– kdegraphics-strigi-analyzer
– libsoprano4
– soprano
– soprano-backend-redland
– soprano-backend-virtuoso
– virtuoso-drivers
– virtuoso-server
The next step is to activate the nepomuk-services and make KDE applications nepomuk-”aware”. Go into the Service Manager (simply enter “service manager” in the KDE menu search bar) and make sure the startup-service “Nepomuk Search Module” is up and running.
Next, open the desktop search configuration (enter “desktop search” in the KDE menu search bar).

Make sure that the options “Enable Nepomuk Semantic Desktop” and “Enable Strigi Desktop File Indexer” are checked.
Now go into the tab “Desktop Query”.

Here you can customise the files and folders that you want Strigi to index. The option “Customize index folder…” opens the selection dialog.

The exclude filters are good as they are, but in the “Strigi Index Folders” you have to choose yourself which files should be in your index. This depends on which files you want to find quickly using tags and keywords. It’s recommended for folders inside your home directory, for example pictures, music, cumulated download folders (because of the little informative file names), educational scripts (you can view what it is about without opening it), and everything where the natural structure through the file system comes to its limits.
It’s not recommended for all the other system folders (bin, boot, dev,…) programming (too much text and therefore long indexing times), their version management systems (like SVN), ebook-folders (too much text too).
Because of the fact that the indexing database grows quickly, you really should only index your personal files and collections, where you are in need of better structure. For finding system files or grabbing their content, it’s better (and much faster) to use the traditional locate-tool on the command line and non-indexed search tools like find, grep or the KDE find utility Kfind.
So now that Nepomuk is set up, it will start the initial file indexing (if it doesn’t, try a reboot). It’s indicated with the Nepomuk file indexing icon ![]() in the task bar. Right-clicking this icon lets you choose the options mentioned before.
in the task bar. Right-clicking this icon lets you choose the options mentioned before.
Depending on how many files are in your chosen directories, the initial indexing can take a while. It only takes this long at the first time, but this reveals a big disadvantage of the Nepomuk semantic desktop: A fast index checking has to be performed at every startup of KDE, even if there were no modifications, because it is not possible to determine whether there was a modification between the two restarts or not. So Strigi has to scan the whole filesystem at every startup, which takes about 20 minutes and has low CPU priority, so it shouldn’t affect your work too much, and you can suspend it at any time (by right-clicking on the file indexing iconand choosing “Suspend File Indexing”).
Now Nepomuk is set up and ready to use, so let’s assign some meta-data.
3) Using Nepomuk
3.1) Dolphin
There are some documentations on the internet that state that search queries can be executed using the search field in Dolphin, but in KDE 4.7 the search bar in Dolphin doesn’t exist any more. Instead, there are two buttons in Dolphin that are important for Nepomuk: Search and Find.

The Find-button opens the search bar for indexed file and content search, the Search-button shows the sidebar where you can search for filetypes, change dates, ratings and tags. The indexed search and the metadata-search can even be combined.
If you don’t see the Search and Find buttons, you can add them using “configure toolbars”, either right-click somewhere in the free space right beside the buttons, or show the Dolphin-Menu with Ctrl+M and click on settings-> configure toolbars.
The indexed search can be used even without having assigned metadata to a file, like rating or tagging. Simply enter a search term into the search bar and choose if only file names or the whole file content should match, and if you want to search only in the current directory or everywhere.
Note that as soon as you enter the first character in the search bar, the indexed search begins and lists every file matching the search criteria. This list is updated continuously while you write, so emptying the search bar by deleting all characters lists the whole file index – this cantake a while.
There are some simple rules for performing search queries:
– Search terms can contain blanks, so even whole sentences are possible
– The asterisk “*” is the wildcard, you only need it for for parts inside a word. (i.e. “th*y” matches “theory”). At the end and the beginning of a search term there is always a wildcard.
– The index is built on keywords, this means the blank is the natural separator. In order to search for a whole word, you just need to enter it, without any wildcards.
– To search for a middle part, just enter the middle part, the wildcards are added automatically.
(i.e. searching for *eor* or eor matches for example with teori, theory, theorie, musictheory,…)
– Matches of the search query in the absolute path of the files as well as in the tags are also listed.
Unicode Bug:
Virtuoso 6.1.3 suffered from a unicode bug. The Unicode bug caused wrong indexing of special characters (ä, ö, ü, å, é,…) so that they appeared in search queries even if they didn’t match. You can test if you have wrong index files: Go to the filename-search, and enter a short search term with two wildcards (i.e. *eor*). If wrong results appear, and they have special characters in them, it’s due to the unicode-bug.
You can easily rescan the files:
In KDE <= 4.7:
Just open a terminal and enter (without any line breaks):
qdbus org.kde.nepomuk.services.nepomukstrigiservice /nepomukstrigiservice org.kde.nepomuk.Strigi.indexFolder /directory/ 1 1
Where /directory/ is the directory where the indexing should start (it walks recursively afterwards, you just need the upper directory where you want to start, i.e. your home directory)
In KDE 4.8:
Just open a terminal and enter (without any line breaks):
qdbus org.kde.nepomuk.services.nepomukfileindexer /nepomukfileindexer org.kde.nepomuk.FileIndexer.indexFolder /directory/ 1 1
Where /directory/ is the directory where the indexing should start (itwalks recursively afterwards, you just need the upper directory where you want to start, i.e. your home directory)
Further information about the Unicode bug:
https://bugs.kde.org/show_bug.cgi?id=271664
http://trueg.wordpress.com/2011/12/05/manually-forcing-the-re-indexing-of-folders-is-easy/
Searching via tags and rating:
Searching via tags and rating can either be done additionally to the keyword search or stand-alone. In order to search for them, they have to exist in the first place. To do this, click on any file you want and edit the parameters in the information area (on/off with F11). You can configure the amount of information shown there by right-clicking inthe empty area and choosing “configure”. There are 3 editable Elements:
– Comment (arbitrary text)
– Rating (choosing between 0 and 5 stars)
– Tags (choosing existing or creating new tags)
Any other information displayed can be used for a search query, as it will be mentioned later.

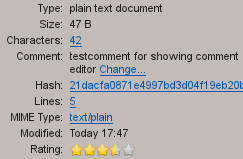
Comments:
To add a comment, click on the blue “Add Comment…”-text to open the comment editor window.

Now write your comment into the editor and hit “OK” or Alt+o.
The saved comment is displayed in the information field:

Rating:
Just click the desired amount of stars (you can also cut them in half) to rate your document:
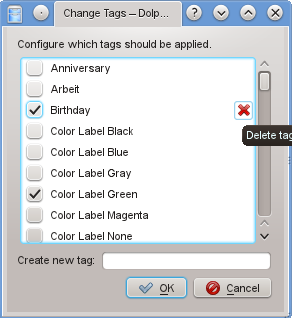
Tags:
Clicking on the blue text“Add Tags…” lets you choose existing tags (if there are any) or creating new tags.

Some KDE Applications (like DigiKam) add tags themselves. You can create a new tag by simply writing its name in the text field. If the tag already exists,the old tag is used (so be careful with the writing to not have 2 tags in different spelling that were meant to be the same). Hitting OK saves the tags.
NOTE: Special characters, like ö, ü, ä, é, å,… weren’t displayed correctly in the add tags field and, even worse, couldn’t be deleted any more. So it’s best not to use them.
Now they are displayed in the information field, too:

Deleting a tag:
Open the add-tags window again and move the mouse to the right side of the white area besides the tag name. A red “X” appears to delete the tag.
The information entered in comments and tags is also used in the indexed search.
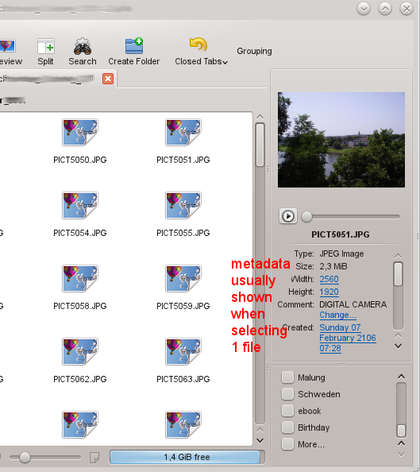
Editing metadata of more than one file at once:
BUG: To select more files and assign metadata to them all at once, you have to be carefully because of a bug in Dolphin. If you select more files (using Shift, Strg or the mouse), the information in the information panel on the right-hand side is not updated instantly, but with a delay of some seconds, especially in folders with many files, where all are selected with Strg+A. Editing the metadata too early causes a certain crash of Dolphin (but fortunately nothing worse happens). So you have to wait until the long list of metadata (which is usually shown when one file is selected) disappears and only the selection of comments, rating and tags appears, then it is safe to edit them.


To search the Nepomuk-database using the entered comments, ratings and tags you can use the information panel (to search for files with the same values, i.e. the creating date, just click on the value in the information panel, and all files with the same value are listed) or the search panel (F12 or clicking on Search-button). You can search for document types, modification dates, rating, and you can see your own tags at the bottom of the panel.
Simply clicking on an option invokes a search over the whole database for this value. Clicking on “more” opens the tag window, where you can search in your list of tags.

To combine indexed text search and metadata-search, click first on Find to invoke a query for a text, and then choose the options you want from the search panel.
Creating Virtual folders:
Normally, files are grouped in folders by location, that means, the folder view shows all the files that are located in this folder. The Nepomuk virtual folders groups files by search criteria, which means all the files matching certain search criteria are displayed in the virtual folder, independently of their real location on the hard disk. This can be useful if you need a couple of files from different folders frequently. Then there is no need to switch folders or copy files to another location all the time, because all of the files are shown in one virtual folder.
In order to create a virtual folder, perform an arbitrary search query, and make sure you have your places-panel displayed (F9). Then right-click in some free space in the file area and choose “Add toPlaces…”.

Label your new entry and and leave the location as it is. If you want to use that folder in other applications besides Dolphin, uncheck “Onlyshow when using this application (Dolphin)”. Then click OK. Your virtual folder is now in your places panel, a click on it performs a Nepomuk search and displays the results. That means, if new files are coming to match the search criteria in the future, they will be displayed automatically alongside the others. It a file loses the search criteria, it will disappear.
Clicking on “testfolder” lists all files with the tag “Birthday” in the file view as if it were a normal folder.

3.2) digiKam
Unlike Dolphin, digiKam can use a separate database for storing its metadata. The use of Nepomuk has to be activated manually in “Settings → Configure digiKam” and then in “Metadata →Nepomuk”. Make sure the options “Store metadata from digiKam in Nepomuk” and “Read metadata from Nepomuk” are activated. If you have already set some metadata in digiKam that you want to synchronise with Nepomuk, click on “Fully Resynchronize again”.

DigiKam is able to store lots of metadata for every picture, but not all of it is synchronised with Nepomuk, and only tags and ratings appear in other applications (like Dolphin). In order to manually tag a picture in digiKam, select it and click on “Caption/Tags” in the menu on the right hand side of digiKam.
Click on “Tags” to see and choose tags from you list of tags. To create a new tag, right-click on “My Tags” (or alternatively right-click on the picture itself and choose “Assign Tags → Add New Tag…”)

Now the tag editor opens. It lets you assign tags to a picture by writing them into the title field (separated by commas). To create hierarchical tags, use the slash “/”.
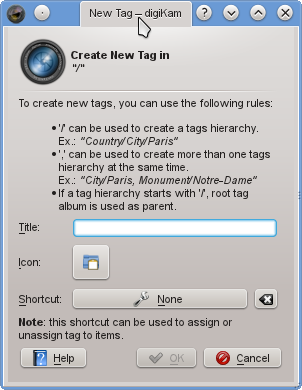
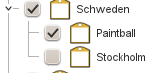
Hierarchical tags appear as a folder structure in digiKam to let you find them easier and avoid long lists of tags, in other applications they appear as single tags. For example, a tag tree with “Schweden” as a main tag and “Stockholm” and “Paintball” as sub-tags will appear as 3 different tags in Dolphin.
In the tag editor you can also assign shortcuts to tags, so different tags can be assigned to selected pictures via different shortcuts. Tags that already exist or that are already assigned will be left unchanged, all the others are assigned or created and assigned.
To browse your tagged pictures, click on “Tags” in the side menu at the left-hand side of digiKam. By clicking on a tag, all the pictures with this tag are shown, grouped by albums. Note that only pictures of digiKam-albums are shown, and not of the whole disk.
To rate a picture in digiKam, just hover the mouse pointer over it and chose an amount of stars, or click on it and select the rating in the “Description”-Tab of the “Caption/Tags” menu on the right-hand side of digiKam.

Tagging pictures in digiKam with face detection
DigiKam has a new feature to detect faces in pictures, which can be tagged afterwards (mostly with the name of the person shown). According to the GUI, there is an option to not only recognise faces, but also recognise the people shown. But at the moment (January 2012) the function isn’t implemented yet and just results in no tags. See
https://bugs.kde.org/show_bug.cgi?id=271679
for further information.
But the recognition of pictures with faces on it works very well and can make the organisation of large image collections much easier.
To start the face detection, click on “People” in the menu on the left-hand side of digiKam.

At the first time, there is no tags but only the button “Scan collection for faces”.
Clicking on it offers two possibilites:

– Detect and recognize faces
The chosen photos are scanned for the appearance of faces. The currently unimplemented functionality would also assign people-tags to them on the basis of other tagged photos where this face appears.
After the detection, all photos with faces on it are shown, or assigned with the tag “Unknown” which you can chose in the tag-area below the “Scan collection for faces”-button. You can either assign a tag directly in the text area below, if you are in the Thumbnails-view:
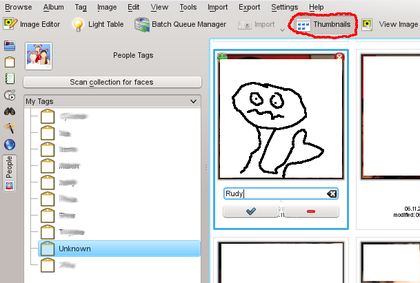
Just enter the name of the person in the picture and click on the blue confirmation icon. Don’t worry if there is more than one face on the picture, every photo is shown as often as the number of faces on it, and every time one person gets tagged.
For every new name, a tag is created in digiKam and Nepomuk (if synchronisation is activated).
If you want to tag the pictures in their actual size, click on “ViewImage” besides “Thumbnails”, that you can tag people by hovering the mouse pointer over them and choosing/creating a tag.
The second option
– Recognize faces
seems to be currently unimplemented. It would already assign the right tags on the pictures where the face is recognised, and tag the rest with“unknown”. At the moment, all are “unknown”.
3.3) Gwenview
In Gwenview, it is also possible to change ratings, tags and comments of pictures.
Jus tmake sure the sidebar is visible (F11).
Then select one picture, and click on the “Information” tab in the sidebar.
Here you can change the ratings, tags and comments.

3.4) Krunner
The Krunner application (Alt+F2) has Nepomuk-integration, too. Activate it with “Nepomuk Desktop Search Runner” in the settings to perform Nepomuk searches via entering keywords. In my opinion, it is much less comfortable than searching via Dolphin, and needs much scrolling in case of long lists.
Tags: comment, desktop, digikam, gwenview, kde, krunner, linux, nepomuk, rating, semantic, strigi, tag, virtuoso

February 10, 2012 at 7:27 pm |
Hey You,
thanks a lot for that work.
That’s what I need today .
Wish I have translated this to German.
N.B. If you give into this window an spellchecker it will be easier for me an others to write this language.
Make a nice time
Peter
February 13, 2012 at 9:17 pm |
Thank you very much!!
But I am not sure what you mean with the spell checker, I don’t think that wordpress.com offers it, you must acitvate it in your local browser settings.
February 15, 2012 at 6:47 pm
Hey Martin,
what I mean is:
spell verification, just to check the right letter arrangement.
And I reckon that is a functionality, what You have to get, install and enable to your WordPress-Backend and also to this window. Maybe look at “WYSIWYG-Editor TinyMCE” or something like this.
But that´s just an idea.
Have nice time
Peter
February 13, 2012 at 9:39 am |
Hello Dear,
again thankyou for this handout.
Let me say something in this at point 2) = seting up Nepomuk…
In my case it will not work out of the box, no, noo, nooo.
I work with KDE 4.8.00, Prozessor Intel 2 Duo CPU P860 , 240 GHz, Prozessor Intel 2 Duo CPU P860 , 240 GHz, and
I have an Kubunto 11.10 and an Win7 dualsystem-installation.
I use the synaptic-packetmanager:
– nepomukcontroller == nothing founded
In the most other cases many packages are shown.
Displayed as : some are installed, some ar not installed.
So I need more information about:
how to checkout, how is indicated ?
*(A) which Modul is working well / and nothing must be installed!
*(B) which Modul failed / and what do I have to install indeed?
to all this and all it`s many packages:
– strigi,
– libstrigi0
– kdegraphics-strigi-analyzer
– libsoprano4
– soprano
– soprano-backend-redland
– soprano-backend-virtuoso
– virtuoso-drivers
– virtuoso-server.
I supposed this is much work and any case is different as well,
but however for me it´s needed.
Or I have to wait until 12.04 will do it (-or not).
Have a nice week overthere,
Peter
February 13, 2012 at 9:28 pm |
Hi!
thanks again 🙂
yes I must admit I wrote and tested this manual on an OpenSuSE 11.4 system with YaST and KDE 4.7 and 4.8, and I thought it works the same on Kubuntu (because everything comes from KDE).
Hm, apparently there are some differences.
Nepomukcontroller was once included in kdebase. try if you find the command “nepomukcontroller” from a terminal. But Nepomuk should run without it anyways, it is just the status icon to show the activity in the systray.
did you find all the other packages in synaptic? just install/reinstall all of them to make sure they are installed.
Actually, what indicates that you Nepomuk doesn’t work? Is “nepomukserver” running as a process? do you have the search field and the tag-search? are your tags recognised? what happens if you enter a search term?
greetings,
Martin
February 15, 2012 at 9:15 pm |
Hi Martin,
This is to indicate ooo—: quotation of your text before :—ooo.
please remove the other posting with the same text.
Hope this is complet.
thanks.
ooo—: Nepomukcontroller was once included in kdebase. try if you find the command “nepomukcontroller” from a terminal. But Nepomuk should run without it anyways, it is just the status icon to show the activity in the systray.:—ooo
I do have that Icon an o the first look it works.
ooo—: did you find all the other packages in synaptic? just install/reinstall all of them to make sure they are installed.: —ooo
Oh man that to many packages, I do’nt know which to choose.
Perhaps I try them all.
ooo—: Actually, what indicates that you Nepomuk doesn’t work? Is “nepomukserver” running as a process? :—ooo
What do I have to start ? I started Systemmonitor and there processtable.
Here we see:
***Nepomukcontrolle
***nepomukserver
***nepomukservicetub (fivetimes !!???)
***virtuoso-t (two times 2)
… found nothing which “Soprano” or so.
Has this to be shown someway in this list also??
ooo—: do you have the search field and the tag-search? : —ooo
yes an yes
ooo—: are your tags recognised?: —oo
sometimes yes , sometimes no.
ooo—: what happens if you enter a search term? :—ooo
there are to ways to search by document_name by content
both cases sometimes yes , sometimes no.
I gat the feeling to be abused as an Alphatester, but no way to give feedback.
A search have to be in the background and “Zuverlässig” trustworthy , not lotteries.
I am going to stopp me from poking this, is´s to frustrating, takes a lot of time with no trustworthy output.
By the way:
In my case Nepomuk has to handle with two “home like Sections”.
Thise are clearly visible if I do the choice, what is ok to indexing. ……
Have a nice time
Peter
February 18, 2012 at 7:05 pm |
Here we see:
***Nepomukcontrolle
***nepomukserver
***nepomukservicetub (fivetimes !!???)
***virtuoso-t (two times 2)
Yeah this is ok
ooo—: do you have the search field and the tag-search? : —ooo
yes an yes
ooo—: are your tags recognised?: —oo
sometimes yes , sometimes no.
ooo—: what happens if you enter a search term? :—ooo
there are to ways to search by document_name by content
both cases sometimes yes , sometimes no.
So basically the services are running and there is some indexing.
The problem is that you are not satisfied with the search results.
Hm, I can’t really do a diagnosis on this over the distance. One measure to search the problem could
be to just select one single directory (where you have some test file in), delete the current nepomuk database
and let the indexing start over again over the test data:
1) select a test directory (i.e. one with some text files and pictures) to be covered by nepomuk
2) stop nepomuk:
qdbus org.kde.NepomukServer /nepomukserver quit
3) delete database
cd $(kde4-config –localprefix)/share/apps/nepomuk
and delete everything in there
4) restart computer and let the initial indexing finish
then try simple operations
(if you tag a new file, is should be found immediately via the tag search, if you change filenames or file content,
it should be found after the next re-indexing, normally performed after the next restart)
if too much results are shown, perhaps your system is suffering from the unicode-bug (see in the tutorial).
if this works, you can extend the indexing on more folders, perhaps you can discover which type of file cannot be found
or causes errors.
greetings,
Martin
February 18, 2012 at 9:13 pm
Hi Martin, thanks again for your Re.
Maybe I will poke again.
What about no Sopran visible in the systemmonitor ?
btw. what do I have to see?
The unicode-bug is checked, with Docs with german-Umlaute,
maybe this is fixed.
Have a great and excellent weekend
Peter
July 25, 2012 at 9:10 pm |
Hey Martin! A reader of your detailed manual suggested on nepomuk mailing list to ask / help you to bring this manual to userbase.kde.org or place where it is easier to find¹! I didn´t read all of it but it looks like a really valuable resource from what I have seen so far.
What do you think? If you like it I suggest you subscribe to the mailing list for further discussion[2]
[1] http://mail.kde.org/pipermail/nepomuk/2012-July/002818.html
[2] https://mail.kde.org/mailman/listinfo/nepomuk
Thanks,
Martin
September 23, 2012 at 7:58 am |
Thanks for this.
About reasons for using or not using Nepomuk: I would be happy not to use Nepomuk, but I want to be able to do full-text searches in Kmail. This is my only reason for enabling Nepomuk (if I disable Nepomuk Semantic Desktop in the settings, the Email Indexer setting is greyed out).
January 21, 2014 at 9:03 pm |
Yes I noticed that too (see the update of my manual), and I think it’s a bit strange, other email-clients (like Opera Mail) offer full text search right from the start.
But I read the linking nepomukkmail will dissapear during the next versions, so there has to come some kind of replacement.
October 23, 2012 at 5:27 am |
Hi Martin, I’d like to second the request to move your wonderful work to Userbase. I was one of the first people to create a manual in userbase (for Amarok), and it was a great experience. It’s even easier and better now, as the entire team worked with us to make Userbase excellent for manuals. As a plus, the translation system is now also excellent, as is the creation of the docbook version of the handbook from your work, which ends up in the Help section of every application’s menus. Please talk to the KDE WWW team about moving your work to KDE infra. They are very responsive in IRC: #kde-www on freenode.
October 26, 2012 at 10:31 am |
Thank you very much!! 🙂 I didn’t have time yet, but I will do it as soon as possible.
But do you know how to handle the fact that there exists already a nepomuk-documentation in the userbase. Do I have to contact the author to arrange the merging?
October 29, 2012 at 4:45 am
It would certainly be a good idea to contact them. Merging is a much better idea than two separate manuals!
January 15, 2013 at 1:11 pm |
One question: In your Screenshot you have the Tags “Color Label …”. where do they come from? From digikam? Or are this labels per KDE default there? I assume that this Tags color up the tagged files / folders?
I am aksing this, because in my KDE (gentoo / KDE 4.9.3) I am missing this labels.
Thank you
Thomas
January 18, 2013 at 1:28 pm |
Hi!
Yes the labels “Color Label xxx” and “Pick Label xxx” come from DigiKam, picture get a colored frame when right-clicked and “assign labels-> color” is chosen. But as far as I know, this color label tags are not shared with other applications (at least in my system, I see no change in Dolphin when I pick a color label in DigiKam)
January 17, 2013 at 6:01 pm |
I am truly thankful to the holder of this web page who has shared this wonderful
paragraph at here.
January 18, 2013 at 1:28 pm |
Thank you very much!!
January 20, 2013 at 4:55 am |
I’ve been exploring for a bit for any high-quality articles or weblog posts in this kind of area . Exploring in Yahoo I ultimately stumbled upon this site. Reading this info So i’m glad to express that I’ve a very good uncanny feeling I discovered just what I needed. I such a lot for sure will make sure to do not omit this website and give it a look regularly.
January 24, 2013 at 12:41 pm |
Thank you, I hope you found what you were looking for. If not: I’m always open for suggestions 🙂
January 24, 2013 at 4:21 pm |
The Websites of the previous two commenters are spam sites.
January 16, 2014 at 6:21 pm |
[…] Just another WordPress.com site « detailed KDE Nepomuk Manual […]
January 16, 2014 at 6:24 pm |
[…] https://kdenepomukmanual.wordpress.com/2012/02/06/detailed-kde-nepomuk-manual/ […]
February 7, 2014 at 10:32 pm |
Hi,
thinking about importing my fully tagged picture collection into Nepomuk.
It does not seem that Nepomuk supports anything like tag hierarchy? Any ideas how to organise a collection with hierarchically organised tags in Nepomuk?
Also, from what I have seen it seems all tags are tied to absolute file name paths – when I move or copy the files from outside KDE should I expect loosing all meta information? Or is Nepomuk smart enough to recognise moved files? Or multiple versions of a file?
February 8, 2014 at 2:34 pm |
Hi Richard,
I think you can try it on a small piece of copies and than you will see. What kind of tag are with you and what you lost.
Test operate test. ..
Greatings from Berlin (former Berlin West 🙂
Paralullus 8.2.2014
February 8, 2014 at 9:27 pm |
Hello Richard!
From where do you want to import the fully tagged picture collection, and which program did you use to tag it? DigiKam supports hierarchical tags, so i the connection digiKam-Nepomuk is enabled, your picture files get also tagged, but not hierarchical (the files just get all of the tag of the hierarchy they are in).
This is true, unfortunately Nepomuk does not support hierachical tagging. I tried moving one tag into the other in the tags:/-view, but it didn’t work (the tag first dissappeared, and after a F5-refresh it was there as before).
I guess the only way at the moment is to tag the files with numerous tags. Even if Nepomuk had hierarchical tagging, it still misses a hierarchical search tool.
Concerning the file name paths:
The meta information is not stored in the file itself, but in a separate Nepomuk-database. But it is not tied to the path, if you move a file, the metadata is still there. If you copy a file, it is seen as a new file (it’s the same behaviour that filesystems use for their access permissions, moving preserves the permissions).
Theoretically, every program/desktop/OS could make use of the Nepomuk-database. Unfortunately at the moment only KDE programs like Dolphin, digiKam and Gwenview use it.
February 8, 2014 at 9:53 pm
Hi, and thanks for the replies.
My old database is in f-spot, I have a python script to export the tags and can write a piece of code to import them either into digikam or nepomuk. As it is a larger collection I am exploring the options before trying it.
How does it work with the meta-information.. because I very often use shell commands to do file moving/copying. I could probably live without the shell for a picture collection but it is a strong habit. I could imagine that meta-information might be associated to md5sums or something like that but never found a hint that Nepomuk made any effort in this direction?
February 11, 2014 at 11:29 am
Hi Richard!
F-spot, DigiKam and Nepomuk do not use the same database scheme, but they all use sqlite as far as I know, so it should be possible to convert something.
I does not matter if you use shell or Dolphin or any other file manager, the same rules apply everywhere:
Move a file: it takes metadata with it.
Copy a file: it is a new file